
(Valentine's Day 3 years ago)
Something like that. Oh yeah. Still, this year, since Chinese New Years fell on the same day, I had to wear a little bit of red (you can see the necklace in the first picture in my previous post!) and I opted out on the heavy eye makeup. Anyhow, I'm sure you care about all the random trivia about me and my habits. So, of course, Valentine's Day means chocolate and sharing love. So, I decided to share my love via chocolate truffles... 4 different types of chocolate truffles!

Chocolate truffles aren't that hard to make ingredient and technique-wise... it just takes a little bit of time and messiness. They're so worth it, though. It's the same technique to make a chocolate ganache (or whipped ganache) for frosting a cake. :)
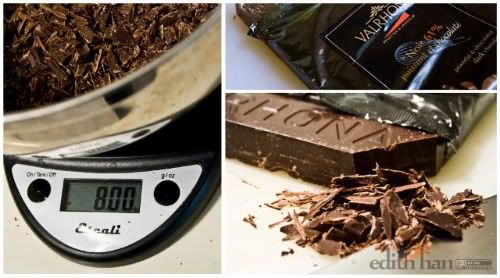
Of course, since it's mostly chocolate, the type of chocolate that you use is very important. If you use a dark, smooth chocolate, you will end up with a very smooth truffle. If you use some mediocre chocolate, you will end up with mediocre truffles. So I splurged a little for the people around me to make some darn good chocolate. Click below for recipe and ideas for truffle flavors!
To flavor your truffle, you can use various alcohols (liqueurs) or fruit puree/jam (or both) or even spices. :) You also need to think of a topping to coat the truffle... I don't do the whole chocolate coating thing... the pure chocolate ganache of the truffle is good enough. :) (That, and I hate melting and tempering chocolate because, well, I suck at it. :P So there.)
Chocolate Truffles
Adapted from various truffle recipes.
Makes ~30 truffles.
Ingredients
* 8 oz. dark chocolate (semi-sweet or bittersweet), finely chopped
* 3/4 cup heavy whipping cream
* 2 TBSP unsalted butter
* flavoring (alcohol, extract, spices, jam; see below) (optional)
* coatings for truffles
Directions
1. Place chopped chocolate in a medium stainless steel bowl. You want to make sure that your chocolate is fairly finely chopped, and about the same size. Otherwise, you'll end up with chunks of chocolate in your otherwise smooth and creamy ganache. Set aside.
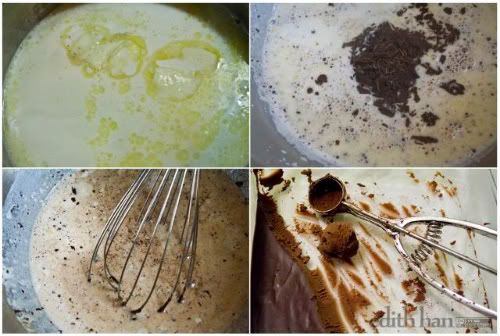
2. Heat cream and butter in a small saucepan over medium heat until brought to a boil. Immediately pour the boiling cream over the chocolate and LEAVE IT ALONE for 5 minutes.
3. After 5 minutes, whisk the cream and chocolate until smooth. Add liqueur if desired. Whisk until mixed. Place in the refrigerator until truffle mixture is firm. Do not cover immediately, as condensation can form and drip back on to the chocolate. Also, you can pour it into a glass dish (no Teflon!) if it fits in your refrigerator better or if you want to use your mixing bowl again. It also helps it cool evenly as well. Leave in refrigerator until firm (a few hours, or even overnight).
4. Place truffle coatings on a plate. Line baking sheet with parchment paper. Remove truffle mixture, and using your hands, a melon baller, a very small cookie scoop (my favorite!), or a small spoon, scoop out bite-sized ganache and roll into a ball (~1" in diameter? It doesn't have to look perfect!) between the palms of your hands. I HIGHLY suggest gloves. Partially because I hate the feel of melted chocolate on my hands, and partially because it just gets really messy, especially if you have warm hands (I know I don't usually have warm hands, but when I'm baking, they get ridiculously hot). Immediately roll truffle in coating and place on parchment paper. Cover and place in refrigerator until firm. Truffles should be stored in the refrigerator for a couple of weeks, or frozen for a couple months. Bring to room temperature before serving.
Flavoring
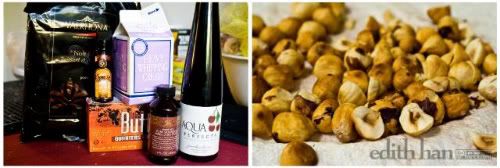
For flavoring, you can use various alcohols, extracts, spices, or even fruity jam. For alcohol, I used about 2 TBSP, but it really comes down to taste. You can also use various delicious spices that go well with chocolate... my favorites are cinnamon and cardamom. For the plain dark chocolate one, I added in a TBSP of vanilla extract just to enhance the flavor of the chocolate.
For the cinnamon-cardamom spiced truffle, I boiled the heavy whipping cream with 1/2-1 tsp of cardamom (it's a very strong flavor!) and a cinnamon stick. After the cream started boiling, I let it cool and let the cinnamon stick steep for an hour. Then, I strained the cream, heated it to boiling again before pouring it over the chocolate.
For coffee-spiked truffle, I put some instant coffee granules (espresso is probably better, but I don't have any!) into the cream before boiling it. Then, I pour in 2 TBSP Kahlua before chilling.
For raspberry dark chocolate truffles, I put 1.5 TBSP strained raspberry jam in the chocolate before pouring on the cream. Then, I used 1.5 TBSP of framboise (raspberry liqueur) into the mixture before chilling.
Coating
For coating, you want to think of something that will pair well with the flavor of your truffle. It's nice having different coatings for each flavor. It can not only enhance the flavors of the truffle, but then people can distinguish between the various flavors!
For example, I paired my dark chocolate truffle with a dutch-processed cocoa powder. I tried confectioner's sugar on the raspberry one, but it turned it into a glaze after being refrigerated so it just became a sticky truffle. Maybe I'll try some shaved chocolate next time. I mixed together a light cocoa powder and a dark cocoa powder with some cinnamon for my cinnamon-cardamom spiced truffle. I toasted some hazelnuts and chopped them up to roll my coffee-spiked dark chocolate ones (hazelnuts + coffee + dark chocolate = omg amazing). Some other options are other various nuts, toasted coconut, crushed cookies, or even crushed candies (like peppermint candies!).
To toast nuts: Preheat oven to 350F. Spread nuts evenly in one layer on baking sheet and bake for 8-10 minutes (or until brown and fragrant). For hazelnuts, toast for 15 minutes, or until the skins darken and start to blister. Remove from oven and roll hazelnuts in a clean dish towel to let "steam" for 5 minutes. Rub the hazelnuts in your towel (or I used a paper-towel lined towel) to remove skins. Once the nuts have cooled, chop coarsely.


No comments:
Post a Comment
All comments are screened for appropriateness. Commenting is a privilege, not a right. Good comments will be cherished, bad comments will be deleted.